主要是对NIO各个组成部分进行介绍和简单使用
概述
Java NIO(New IO 或 Non Blocking IO) 是从Java1.4版本开始引入的一个新的IO API,可以替代标准的Java IO API,NIO支持面向缓冲区的、基于通道的IO操作。NIO将以更高效的方式进行文件的读写操作。
阻塞IO(BIO)
阻塞IO也就是同步IO,如果进行读写操作,代码会一直阻塞,直到读取完成或写入完成,传统的解决方式是使用多线程来处理,但是及其消耗服务器资源,而且线程池线程数也是有限的,如果只能开100个线程,试想一种场景,100个客户端都在下载一个大文件,然而第101个请求来了,只请求一个几十kb的网页,但是也得等有空闲线程才可以,所以也是无法处理这个请求的
使用BIO实现简单服务器
使用多个telnet 127.0.0.1 8888
ctrl + ] > send message进行发送消息
单线程测试:一次只能处理一个请求,只有那个连接关闭,才可以处理下一个连接请求
多线程测试:可以处理多个,但是线程资源有限,处理请求数依然不乐观-
BIO实现简单服务器,来一个请求开一个线程
public static voidmain(String[]args)throwsIOException{
ServerSocket serverSocket =newServerSocket(8888);
    ThreadPoolExecutor threadPoolExecutor =newThreadPoolExecutor(10, 20, 5,
            TimeUnit.SECONDS,newLinkedBlockingDeque<>(), Executors.defaultThreadFactory(),newThreadPoolExecutor.AbortPolicy());
while(true) {
System.out.println("等待连接...");
        // 如果没有连接将会一直阻塞在accept
        Socket socket = serverSocket.accept();
        // 如果可以运行到这一行,证明不再是在accept阻塞了,也就是有连接进来了
        System.out.println("有客户端连接了!");
        // 有连接后,main线程把连接交给线程池中的一个线程去处理,main继续等待连接...
        threadPoolExecutor.execute(()->handler(socket));
}
}

/**
 *读取已连接的Socket数据
*@paramsocketsocket
 */
private static voidhandler(Socket socket){
try{
System.out.println("当前线程:" + Thread.currentThread().getName()
+ "处理客户端请求,客户端地址:" + socket.getRemoteSocketAddress());
byte[]bytes =new byte[1024];
        InputStream inputStream = socket.getInputStream();
intlength;
while((length = inputStream.read(bytes))!= -1) {
System.out.println(newString(bytes, 0, length));
}
    }catch(IOException e) {
e.printStackTrace();
}finally{
try{
socket.close();
            System.out.println("连接关闭,客户端地址为:" + socket.getRemoteSocketAddress());
}catch(IOException e) {
e.printStackTrace();
}
    }
}
非阻塞IO(NIO)TODO
可以用一个线程,处理多个客户端的连接
NIO组成部分
由以下几个核心部分组成
- Channels
- Buffers
- Selectors
这三个构成了核心API,还有其他组件如Pipe和FileLock,只不过是三个核心组件共同使用的工具类
Channel
可以翻译成通道,可以和IO中的Stream流对比着理解,传统IO中的流是单向的,但是Channel是双向的,既可以读也可以写。
NIO中的Channel主要实现有FileChannel、DatagramChannel、SocketChannel和ServerSocketChannel,分别对应文件IO、UDP和TCP(client和server)IO
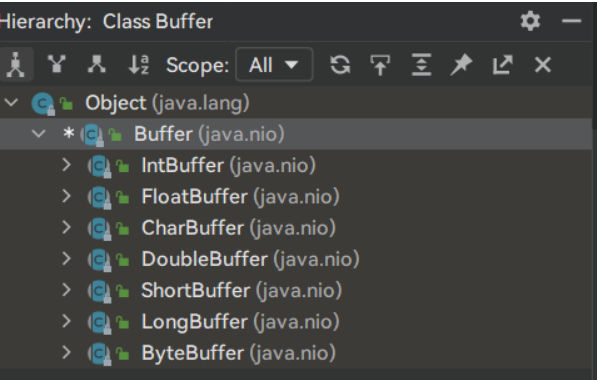
Buffer
NIO 中的关键 Buffer 实现有:ByteBuffer, CharBuffer, DoubleBuffer, FloatBuffer, IntBuffer, LongBuffer, ShortBuffer,分别对应基本数据类型: byte, char, double, float, int, long, short。
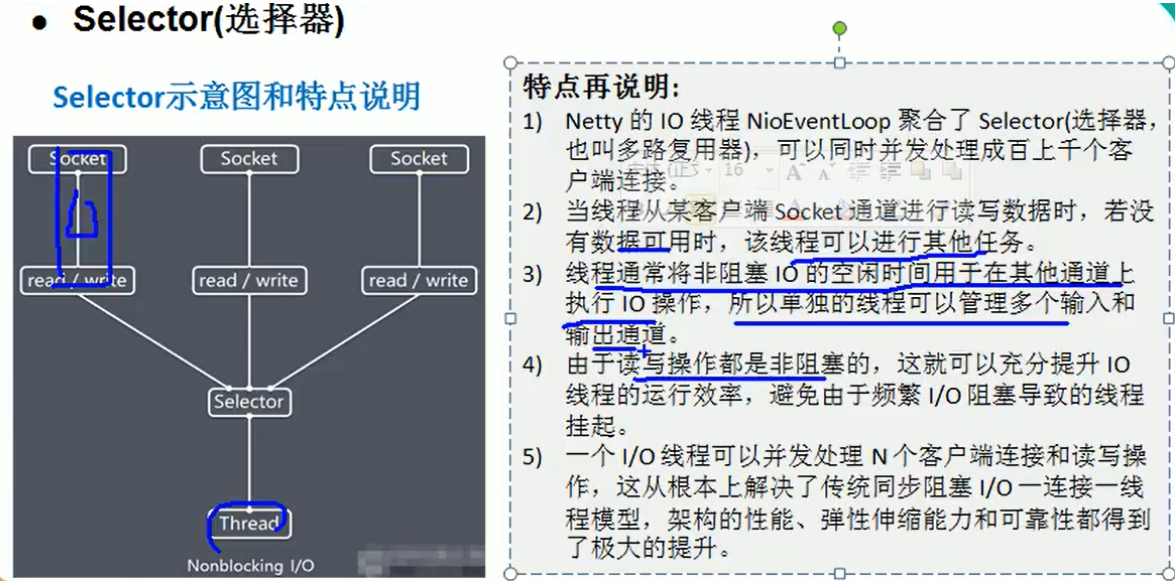
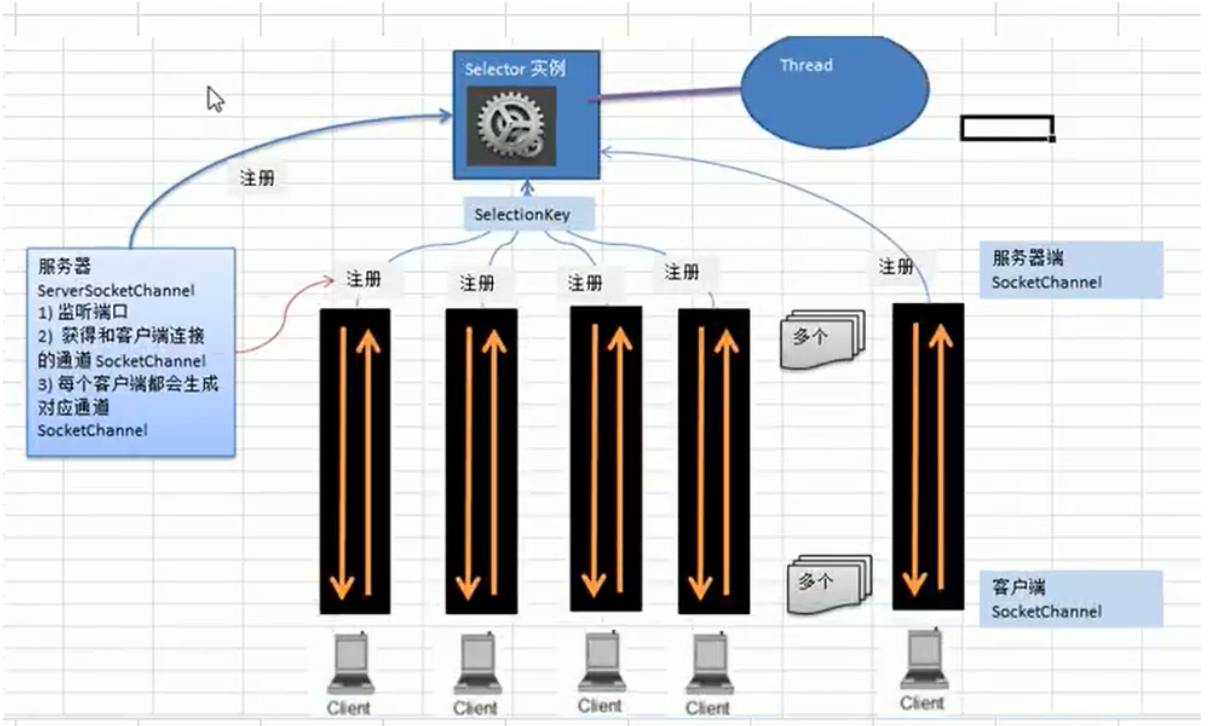
Selector
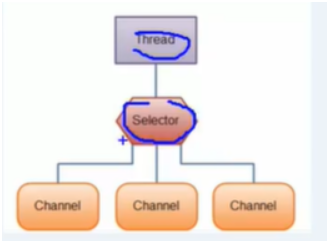
Selector 运行单线程处理多个 Channel,如果你的应用打开了多个通道,但每个连接 的流量都很低,使用 Selector 就会很方便。例如在一个聊天服务器中。要使用 Selector, 得向 Selector 注册 Channel,然后调用它的 select()方法。这个方法会一直 阻塞到某个注册的通道有事件就绪。一旦这个方法返回,线程就可以处理这些事件, 事件的例子有如新的连接进来、数据接收等。
三个组件之间的关系
先上图
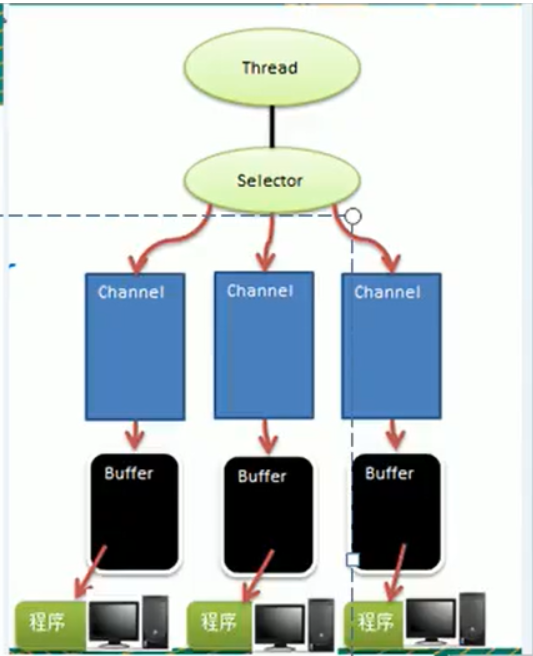
关系图说明:
- 每个Channel都会对应一个Buffer
- Selector对应一个线程,一个线程对应多个Channel(连接)
- 该图反应了有三个channel注册到该selector程序
- 程序切换到哪个channel是由事件决定的,Event就是一个重要概念,具体事件是啥意思?可以类比前端中的点击事件onClick,这里的事件可以是网络连接,数据读取
- selector会根据不同的事件,在各个通道上切换
- buffer就是一个内存块,底层就是一个数组
- 数据的读取和写入都是通过Buffer来的,这个和BIO中的不一样,BIO中要么是输入流,要么是输出流,不能双向,但是NIO的Buffer是可以读也可以写,但是需要flip方法切换模式
- channel是双向的,可以返回底层操作系统的情况,比如Linux,底层操作系统的通道就是双向的
Channel
channel是基于流实现的,比如说创建一个输出流,才能创建channel,到时候数据也都是在这个输出流的channel里面
通道和传统的IO流还是有区别的:
- 既可以从通道中读取数据,又可以往通道里写数据
- 通道可以异步读写
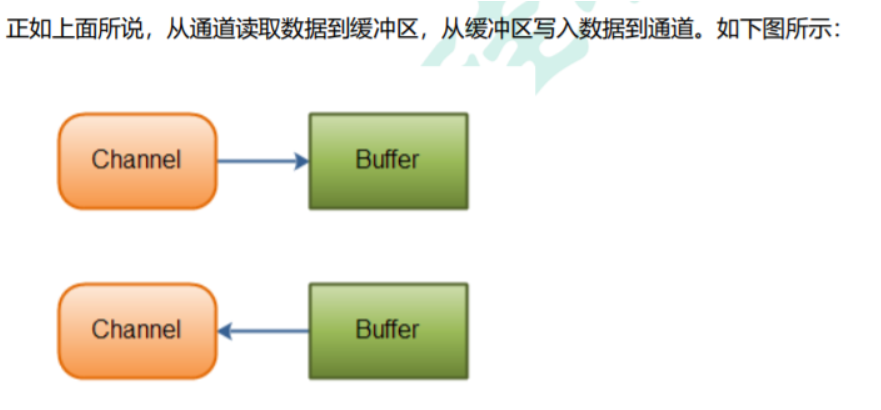
- 通道中的数据总是要先读取到一个Buffer中、或者从一个Buffer中写入
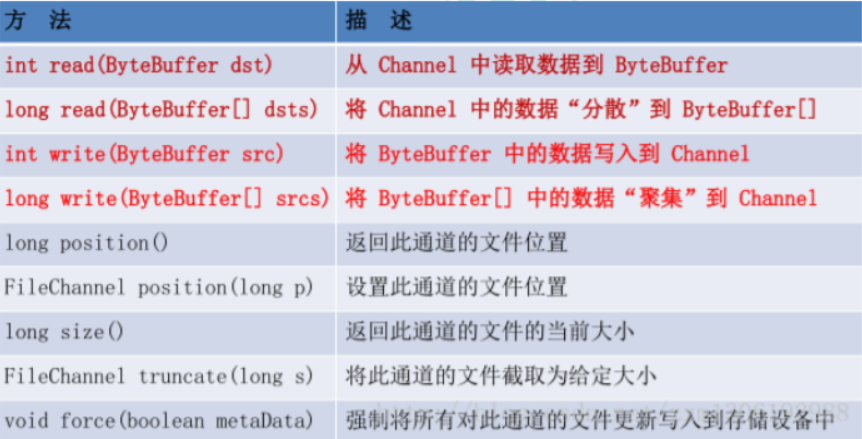
重要的Channel实现
- FileChannel:文件IO
- DatagramChannel:通过UDP读取网络中的数据
- SocketChannel:通过TCP读取网络中的数据
- ServerSocketChannel:可以监听新进来的TCP连接,像web服务器那样,对每一个新进来的连接都会创建一个SocketChannel
通道覆盖了文件IO和网络IO,牛比!
FileChannel介绍和示例
API概述:
-
使用FileChannel读取数据到Buffer中
public static void main(String[] args) throws IOException { RandomAccessFile randomAccessFile = new RandomAccessFile("d:\\hello.txt", "rw"); FileChannel channel = randomAccessFile.getChannel(); // 接收数据的Buffer ByteBuffer buffer = ByteBuffer.allocate(48); int read = channel.read(buffer); while (read != -1) { System.out.println("读取了:" + read); // 将缓存字节数组的指针设置为数组的开始序列即数组下标0。这样就可以从buffer开头,对该buffer进行遍历(读取)了。 buffer.flip(); while (buffer.hasRemaining()) { // 读的字节转成字符,查看字符是否与文本一样 System.out.println((char) buffer.get()); } buffer.clear(); // 有可能一次没读完,继续读(就是文件大小字节数大于缓冲区设定的字节数的时候,需要接着读) read = channel.read(buffer); } channel.close(); System.out.println("结束了!"); } -
使用FileChannel向文件中写入数据
private static void channelWrite() throws IOException { RandomAccessFile randomAccessFile = new RandomAccessFile("d:\\hello.txt", "rw"); FileChannel channel = randomAccessFile.getChannel(); // 把以下数据写入文件 String newData = "write some words..." + System.currentTimeMillis(); ByteBuffer buffer = ByteBuffer.allocate(48); buffer.clear(); buffer.put(newData.getBytes(StandardCharsets.UTF_8)); buffer.flip(); while (buffer.hasRemaining()) { channel.write(buffer); System.out.println("已经写入..."); } channel.close(); } -
FileChannel其他方法演示如position、size、truncate、force演示
private static void otherFunction() throws IOException { RandomAccessFile randomAccessFile = new RandomAccessFile("d:\\hello.txt", "rw"); FileChannel channel = randomAccessFile.getChannel(); // position,定到channel的特定位置来进行读取写入操作 // position 设置在文件结束符之后,读取得话会返回-1,写入的话可以正常写入,但是会造成文件空洞,磁盘上物理文件写入的数据间有空隙 long position = channel.position(); System.out.println("channel 当前位置:" + position); channel.position(position + 12); System.out.println("channel 改变位置:" + channel.position()); // size() 获取该通道所关联文件的大小 System.out.println("channel所关联文件大小为:" + channel.size()); // truncate() 方法,截取文件,下面的情况就是会把第20个字节之后的内容都删除 channel.truncate(20); System.out.println("截取后文件大小:" + channel.size()); // force(boolean metaData) 可以类比为stream中的flush方法,把缓冲区的内容刷到磁盘上 // 这个布尔类型的参数含义是是否将文件元数据(权限信息等)写入到磁盘 channel.force(true); } -
通道间通信,transferFrom和transferTo
private static void transferData() throws IOException {
        RandomAccessFile aFile = new RandomAccessFile("d:\\hello.txt", "rw");
        RandomAccessFile bFile = new RandomAccessFile("d:\\test.txt", "rw");
        // 将aFile中的内容复制到bFile中
        FileChannel fromChannel = aFile.getChannel();
        FileChannel toChannel = bFile.getChannel();

        // transferFrom,从目标channel传数据到当前channel
        // 从fromChannel的位置0,复制size个字节到toChannel中
        toChannel.transferFrom(fromChannel, 0, fromChannel.size());

        // transferTo,从当前Channel传数据到目标Channel中
        RandomAccessFile cFile = new RandomAccessFile("d:\\c.txt", "rw");
        FileChannel cFileChannel = cFile.getChannel();
        fromChannel.transferTo(0, fromChannel.size(), cFileChannel);

        aFile.close();
        bFile.close();
        cFile.close();
        System.out.println("复制完成!");
    }
SocketChannel介绍和示例
共有三种SocketChannel
- ServerSocketChannel:注意这个是没有读写操作的,主要作用就是用于监听一个端口,来了连接了就创建一个SocketChannel对象去处理连接请求
- SocketChannel:基于TCP建立套接字连接
- DatagramChannel:基于UDP进行读写网络数据
ServerSocketChannel
下面是一段监听端口是否有连接的程序,有连接就打印远程连接的地址,无连接就打印null
注意非阻塞的使用
-
具体代码
public static void main(String[] args) throws IOException, InterruptedException {
        int port = 8888;
        ByteBuffer buffer = ByteBuffer.wrap("hello,nio!".getBytes(StandardCharsets.UTF_8));
        ServerSocketChannel serverSocketChannel = ServerSocketChannel.open();
        serverSocketChannel.bind(new InetSocketAddress(port));
        // 设置模式非阻塞,如果设置为true得话,就会阻塞,也就是下面accept的时候,必须得有连接进来才会进行下面的if判断
        serverSocketChannel.configureBlocking(false);
        while (true) {
            System.out.println("waiting for connections...");
            // 如果设置成阻塞的话,没有连接的情况,就会一直阻塞到这一行,后面的代码也不会执行
            SocketChannel socketChannel = serverSocketChannel.accept();
            if (socketChannel == null) {
                System.out.println("null...");
                Thread.sleep(2000);
            } else {
                System.out.println("incoming connection from: " + socketChannel.getRemoteAddress());
                // 缓冲区指针指向0
                buffer.rewind();
                socketChannel.write(buffer);
                socketChannel.close();
            }
        }
    }
SocketChannel
下面是SocketChannel建立一段连接的程序
-
SocketChannel建立连接
public static void main(String[] args) throws IOException {
        // 使用open(SocketAddress remote)
        SocketChannel socketChannel = SocketChannel.open(new InetSocketAddress("www.baidu.com", 80));

        // 方式二 使用connect
        SocketChannel sc = SocketChannel.open();
        sc.connect(new InetSocketAddress("www.baidu.com", 80));

        // 设置非阻塞
        socketChannel.configureBlocking(false);

        ByteBuffer buffer = ByteBuffer.allocate(1024);
        socketChannel.read(buffer);
        socketChannel.close();
        System.out.println("read over!");
    }
DatagramChannel
Buffer
buffer实际是啥
buffer底层就是维护着一个数组,如byteBuffer,就是维护一个byte[]
如:
final byte[] hb;真正的数据其实就是存在这个数组里面了
buffer都有java基本类型的实现,想读啥样的数据,就选对应buffer即可
其实ByteBuffer用的最多,因为在网络传输时,基本单位也都是用的字节
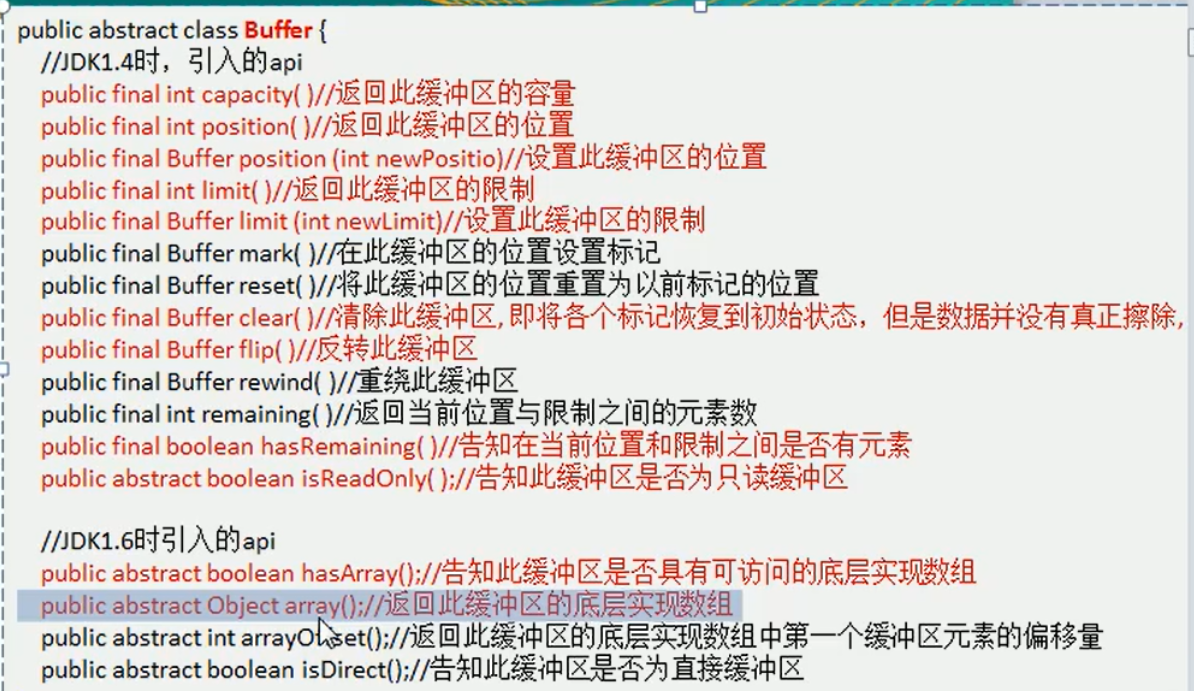
顶层抽象类Buffer类
定义了几个关键参数
// Invariants: mark <= position <= limit <= capacity
    private int mark = -1;
    private int position = 0;
    private int limit;
    private int capacity;
position:实时记录指针当前位置
limit:当前数组的数据大小,比如数组大小是10,只存了5个数据,limit就是5
capacity:数组容量,就是数组的实际大小,一旦确定不能修改
mark:标记?还没发现有啥用呢
buffer常用API
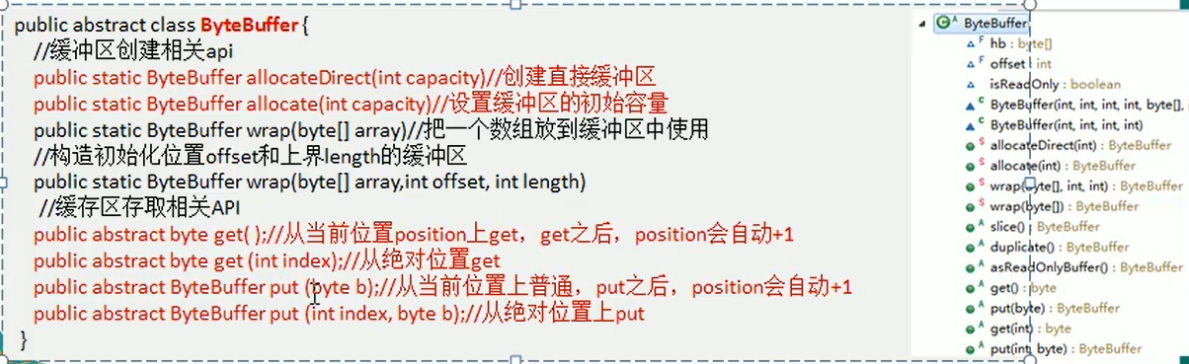
ByteBuffer常用API
MappedByteBuffer
可以直接在内存中修改文件,没有尝试过,没见过,见过再说
分散和聚集(Scatter和Gather)
之前都是在一个Buffer中操作的,我们这里可以用多个buffer来操作
Selector
概述
Selector能够检测多个注册的通道是否有事件发生(多个Channel以事件的方式可以注册到同一个Selector),如果有事件发生,便获取事件然后针对每一个事件进行相应的处理,这样就可以用一个线程去管理多个连接了!
特点说明
运行过程
具体使用
- 生成各种channel对象
- 然后使用channel.regiister(selector, op_accept),第二个参数是各种事件,注册到selector中
- 然后selector.select(long timeout),检查有没有事件发生,如果返回0,无事发生,其他就有事件了
- 然后获取selectionKeys,遍历这个集合,挨个查看每个key发生的是啥事件,是accept还是read还是啥的
- 然后根据key获取channel,也就是调用key.channel方法,然后根据实际情况进行强转为具体的channel,然后进行accept或者read操作或者其他操作
-
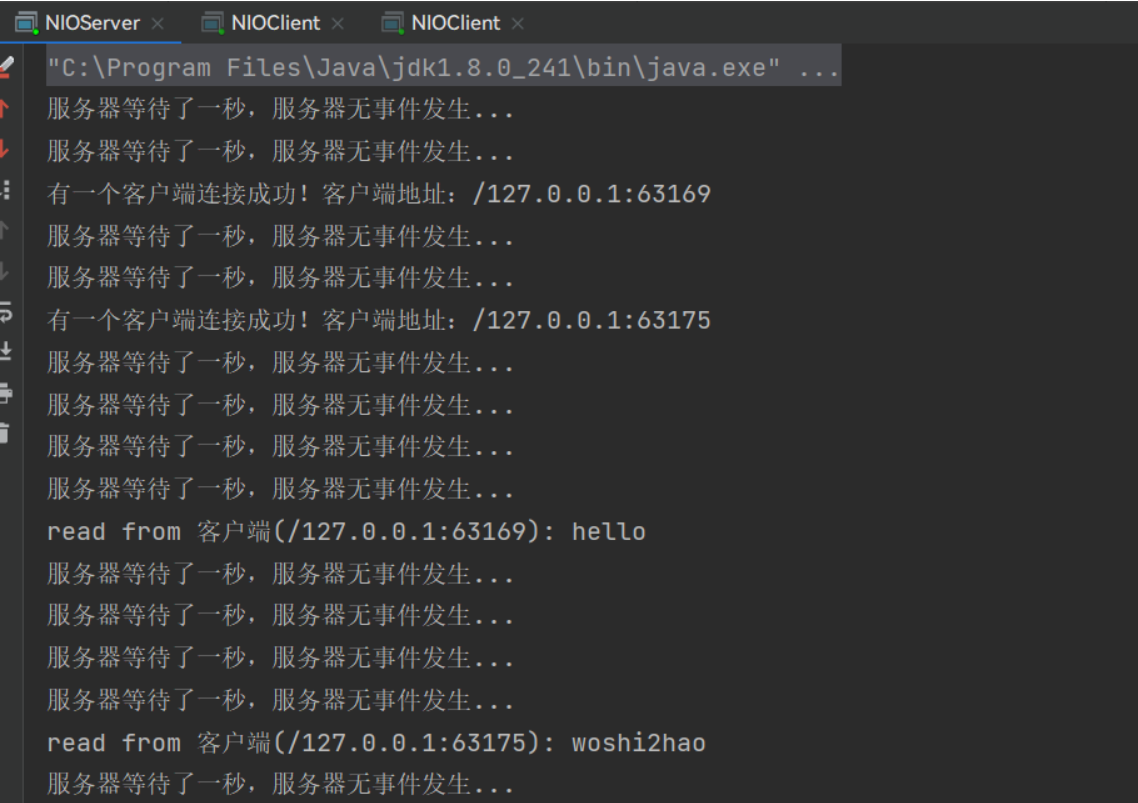
实际NIO写的服务器代码,服务端的作用就是监听有没有客户端连接,有了建立连接,如果客户端有发送(write)数据,就读取(read)并打印客户端发的数据
public static void main(String[] args) throws IOException { // 创建serverSocketChannel来接收连接,生成socketChannel来处理连接 ServerSocketChannel serverSocketChannel = ServerSocketChannel.open(); serverSocketChannel.bind(new InetSocketAddress(6666)); // 创建selector对象 Selector selector = Selector.open(); serverSocketChannel.configureBlocking(false); // 将serverSocketChannel注册到selector中去,进行事件(OP_ACCEPT)监听,有连接事件就操作 serverSocketChannel.register(selector, SelectionKey.OP_ACCEPT); // 循环等待客户端连接 while (true) { if (selector.select(1000) == 0) { System.out.println("服务器等待了一秒,服务器无事件发生..."); continue; } // 如果有事件发生了,拿到selectionKeys Set<SelectionKey> selectionKeys = selector.selectedKeys(); Iterator<SelectionKey> keyIterator = selectionKeys.iterator(); while (keyIterator.hasNext()) { SelectionKey curKey = keyIterator.next(); // 如果是OP_ACCEPT 客户端连接事件 if (curKey.isAcceptable()) { ServerSocketChannel channel = (ServerSocketChannel) curKey.channel(); // 接收连接生成SocketChannel,然后就可以进行进一步操作了,进一步操作是啥不管,把这个channel放入到selector管理 SocketChannel socketChannel = channel.accept(); System.out.println("有一个客户端连接成功!客户端地址:" + socketChannel.getRemoteAddress()); socketChannel.configureBlocking(false); // 第三个参数目前含义不明,应该是放读取的数据的,就是这个socketChannel目前有一个专门属于自己的buffer来操作 socketChannel.register(selector, SelectionKey.OP_READ, ByteBuffer.allocate(1024)); } // 如果是OP_READ事件 if (curKey.isReadable()) { SocketChannel channel = (SocketChannel) curKey.channel(); // 这个attachment就是获取register时的第三个参数buffer ByteBuffer buffer = (ByteBuffer) curKey.attachment(); // 是否需要对buffer进行clear,参数重置? buffer.clear(); // 读取到buffer中 int length = channel.read(buffer); System.out.println("read from 客户端(" + channel.getRemoteAddress() +"): " + new String(buffer.array(), 0, length)); } keyIterator.remove(); } } } -
客户端代码,客户端的作用就是往服务端发消息
public static void main(String[] args) throws IOException {
        SocketChannel socketChannel = SocketChannel.open();
        socketChannel.configureBlocking(false);
        InetSocketAddress socketAddress = new InetSocketAddress("127.0.0.1", 6666);
        // 连接不会阻塞
        if (!socketChannel.connect(socketAddress)) {
            // 如果没连上还可以做其他事情
            while (!socketChannel.finishConnect()) {
                System.out.println("做其他事情...");
            }
        }
        while (true) {
            // 输入数据发送
            Scanner scanner = new Scanner(System.in);
            String s = scanner.nextLine();
            // 如果连接成功就发送数据
            // 这个wrap其实就是封装了,创建指定大小,然后挨个put一系列操作,wrap返回的byteBuffer大小就是参数中字节数组的大小
            ByteBuffer byteBuffer = ByteBuffer.wrap(s.getBytes(StandardCharsets.UTF_8));
            // 发送数据,其实就是write
            socketChannel.write(byteBuffer);
        }
    }
运行效果:
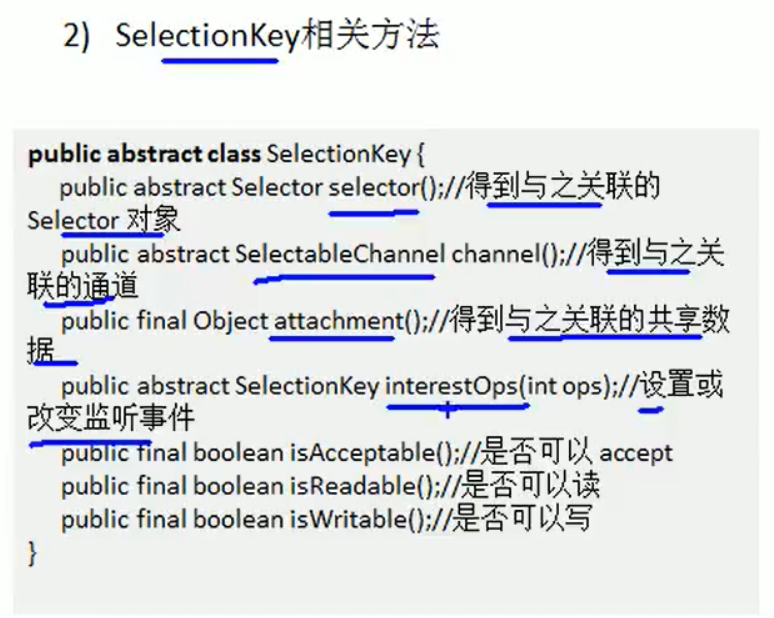
SelectionKey相关API